


Building an Electric Bike
There are plenty of easy-to-use conversion kits out there for about $350, including motor, batteries, and the whole package. This page is an in-depth look at doing it yourself without a kit. The goal was to do so for less than $100 with easily available parts. I'm up to about $150 so far...
For now this is just a collection of important information I have found as I have been researching and experiementing in converting an old clunker mountain bike into an electric-assist commuter.
- Basics / Overview
- Motors, Gears and drivetrain
- Electrical, Wiring & Batteries
- Materials, Welding & Misc.
- Parts List
Basics / overview
Put simply, a bicycle can be converted to electric by adding an electric motor into your drivetrain, some batteries to power it and a switch to turn it on. What complicates the issue is figuring out how powerful your motor should be, how fast it should spin, and how to get it connected to your back wheel. Read on!
I'd suggest going electric-assist as opposed to full-electric. That means that you can pedal if you want to. I'd call a full-elecrtic bike a "scooter".
A battery-powered bicycle will be running a DC motor, as opposed to AC. AC electricity is what lights up your house. Anything that runs on batteries runs on DC electricity. DC motors are typically specified by their Volts, Amps, and RPM. You'll need to find a DC motor, probably 24 or 36 Volts. Motorcycle batteries are appropriately sizes for use on a bike (as in their physical size), and they typically come in 6 or 12 volts, so by stringing them together (properly) you can easily match up to a 24V or 36V motor (these are two very common ratings of motors).
DC Bike/Scooter Motors
Motors (Volts) - A 24 or 36 volt DC motor will be easy to find on eBay or from an elecric bike or scooter parts supplier. 24 Volt models are not quite as powerful, but they require fewer heavy batteries. For a short commute (10 miles or less) on flat ground, 24V might be the way to go. For longer commutes, especially if you need to get up a hill, I'd suggest 36 Volts. The benefits of increasing your voltage beyond 36 quickly drop off with the added weight of batteries, so if you're thinking of going for 48 Volts or more, don't waste your time.
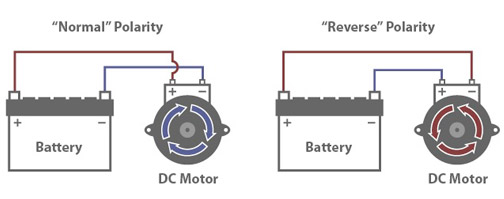
Polarity - For a DC motor, polarity determines in which direction the motor spins, that's which wire (plus or minus) goes on which motor terminal. Fortunately, you won't harm your motor either way, but your bicycle might go backwards. Test your motor, if it spins the wrong way, simply reverse the wires that go to the motor. For most motors neither way is right or wrong.
Gearing, Gear Ratios & RPM
RPM - All motors have an RPM rating. That's Revolutions Per Minute - how fast it spins. But under what conditions? Motor speeds vary greatly depending on load and voltage applied, so what to do? After much research I've found a simple answer: Your motor will be most powerful and most effiecient (use less battery), at exactlty half it's rated no-load RPM. It just so happens that the rating they give you when you buy a motor is the no-load RPM, at the specified voltage. 2,600 RPM is a very common speed, so that's what I'll use in this example:
Let's say you get a motor rated at 2,600 RPM. For max power you should run it at 1,300 RPM. To run the motor at 1,300 RPM, you will have to determine how fast you want to ride, and gear the motor so that it is spinning at 1,300 RPM, when you are riding at your desired speed. Too slow and it will be bogged down, and burn up. Too fast and it will not be adding as much power as it could. Its all about the gearing.
So, how fast do you want to ride? Let's say a nice easy pace is about 16 MPH, but you have a motor now, so you might as well enjoy a little speed on your way to work, so we'll shoot for 20 MPH. In order to match up your motor at 1,300 RPM and your bike at 20 MPH we will have to figure out what kind of gearing to put in between the two. We need to figure out the RPM of a bike wheel at 20 MPH. Let's start by looking at a couple facts:
- The Circumfrence of a 26 inch tire is 82 inches (26 x Pi)
- There are 63,360 inches in a mile
Divide the inches in a mile by the inches in the circumfrence of that tire and you get 773 Revolutions for a 26 inch wheel to go 1 mile (speed has nothing to do with it at this point). So to go 20 miles in an hour (20 mph) we'd have to crank out 15,460 (773 x 20) revolutions per hour, or 257 RPM (15,460 / 60) at the wheel. Great!
Gearing - Now we have all the info we need. We want our motor to spin at 1,300 RPM and our wheel to spin at 257 RPM, so we need to connect them with appropriate gearing. 1,300:257 is a ratio of almost exactly 5:1. That is, the motor spinning at 1,300 RPM is 5 times faster than the wheel, at 257 RPM. Gear ratios are easy in that the ratio of the speed of the gears is determined directly by the diameter of the gears.
An easy example: If we wanted our motor to spin exactly twice as fast as the wheel (2:1 ratio), then the gear on the wheel should be exactly twice as big as the gear on the motor. Every time the motor gear completes a full revolution, the wheel completes only half, because the circumfrence of the wheel gear is twice as long as the circumfrence of the motor gear.
So, back to our bike example. We need our motor gear to spin about 5 times for every single revolution of the wheel gear. That means we want the wheel gear to be 5 times bigger in diameter than the motor gear. Any of these setups would work great:
- 1 inch motor gear, 5 inch wheel gear
- 1.5 inch motor gear, 7.5 inch wheel gear
- 2 inch motor gear, 10 inch wheel gear
Calculate your gear ratio now!
Drivetrain Gear Ratio Calculator
Use this calculator to determine what gear ratio you should use when connecting your motor to your wheel/drivetrain.
Input
It just so happens that the same companies that supply a lot of these electric motors also supply gears, and you can easily find a motor with a 1 inch gear and a gear for your wheel at 5 inches. Perfect. I got my stuff on eBay. ElectricScooterParts.com has lots of cool stuff too.
Here's a quick review of how to solve the speed/gearing problem
- Find the rated RPM of your motor (run it at half the rated RPM)
- Decide how fast you want the bike to go
- How big are your tires? What's the RPM of your wheel at your desired riding speed?
- What's the ratio between the motor RPM and wheel RPM? that's your gear ratio!
Drivetrain Mechanics
Drivetrain - To simplify, I've decided to first convert my bike to singlespeed before adding a motor. This gives me some room on the hub for my drive gear. You could probably keep a few gears on either the front or rear, depending on how you configure your drive chain.
Most electric scooters seem to run #25 chain (like a small bike chain). And the motors are geared for #25 chains too. Another drive option is a toothed belt (like a timing belt). A toothed belt will give you quieter operation. You could also use a bike chain, which is pretty handy for working with other bike parts, gears, etc. But you might have troubles fitting a small bike cog to your motor shaft. Not a lot of options for that as far as I can tell. Maybe a bushing would do it. I've opted to go with the #25 chain.
I've seen a few good options for connecting the motor to the back wheel:
- Chain drive with cog on left side of back wheel
- Chain drive with cog on right side of back wheel (best to me)
- Chain drive that drives the cranks instead of the wheel
Currie makes an adapter that bolts to your spokes for left-side drive, but it is about $129 just for the adapter, and I feel funny about bolting things to spokes. Call me old fashioned. The right side of the hub was intended to have gears attached to it, and with a little monkeying you can get your #25 chain cog on there just fine. I welded my larger #25 gear to a smaller bike cog (off the bike) so it slides right onto the freehub shaft like it was made for it, and assembles with normal hub parts. This setup cost me about $20 for a 65-tooth #25 sprocket and $10 for a used single-speed kit at the local bike shop.
If you can get a small enough bike-chain cog onto the shaft of your motor, you can attach a bike chain right to your rear hub or to your main chainring and/or put a drive crank on the left side and attach your chain to that. Pretty interesting idea, sort of like a Stokemonkey. With this setup, however, you will have to keep pedaling when the motor is in use. No free rides.
Rear Hub Removal - To get the back hub of the bike taken apart you're going to need two specialty bike tools: a lockring remover and a chain whip. You can get them both for about $20 or so. Here's how to do it. For some reason this intimidated me, but it's really easy!
electrical, wiring & batteries
Batteries - As long as the voltage and amps are correct, the DC electricty that comes from one battery is the same as another. But there are other differences that matter quite a bit, especially weight, cost, and re-charge cycle. Here's a quick overview of a few common types:
- Sealed Lead Acid (SLA) - Heavy, cheap, powerful, reliable, best on a budget
- Lithium Ion - Light, Expensive, powerful, reliable, best money can buy
- Nickle Cadmium - These are being phased out. Skip 'em.
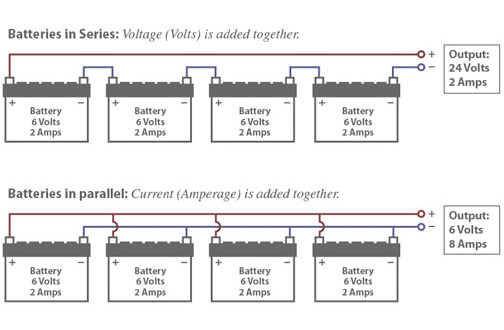
Volts - Electric force is measured in Volts. Think of it like water pressure in a pipe. When building an electric bike you want to power your motor with the correct voltage rating. Connect your batteries in series and the voltage of each battery is added together, current will be as rated on any one battery (not added together).
Amperes (Amps) - Volume of electricity is measured in Amperes. Think of it like the diameter of that water pipe: Quantity, not pressure. Too few amps and your motor won't turn, too many and you'll burn it up. Connect your batteries in parallel and the amperes will add to eachother, voltage will remain as rated on any one of the batteries (not added together).
Ampere Hours - The "depth" of a batteries charge capacity is measured in Ampere Hours. That's how much juice it can give for how long. A battery rated at 1 Amp-Hour can supply a steady charge of 1 ampere for one hour. The bigger the better.
Watts - Power output is measured in Watts, whether electric or otherwise. Professional cyclists measure their power output in Watts (Tour de France riders can crank about 400 Watts). When you buy an electric motor it will also have a Watts rating. 300 - 500 Watts is plenty of power for a bike, that's like having Floyd Landis pedaling with you!
Materials, Welding & Misc.
Materials (Steel) - Up until the late 90s there were a lot of steel and Chromoly bikes being made, and the cheaper ones still are. Chromoly is a steel alloy and it is easy to braze with a typical gas torch welding setup. For most of us a gas (oxy-acetylene) welder is fairly affordable and can be used to braze parts onto the bike. Brazing however is not recommended for heat-treated steel such as Reynolds 731. For steel that has not been heat treated, such as Reynolds 531 or Chromoly 4130, brazing is fine.
Materials (Aluminum) - To properly weld aluminum one needs a TIG welder, which is expensive and requires training to use. For that resaon I'm not going to say much about it. If you know how to weld aluminum, go to it. For the rest of us, we're out of luck, with one possible exception: This HTS-2000 stuff is supposedly pretty cool for aluminum brazing. I got some on eBay. Doesn't work for me yet. I'll keep trying. My buddy says it works great for him. Good luck.
Parts & Materials List (for my project)
- 24V DC Motor (350W)
- Brass Brazing Rod
- #25 Sprocket (5 inch diameter)
- #25 Chain
- Single-Speed kit (includes useful cog spacers)
- Lockring Tool and Chain Whip
- (wiring)
- (switch)
- (batteries)
- (charger)
- (chain tensioners)
